UltiMaker
UltiMaker collaborated with the Royal Dutch Navy and Covestro, which put 3D printing to the ultimate test: designing and producing a part capable of lifting a 12-ton armored vehicle.
“How strong are 3D printed parts?”
It’s a question many engineers ask – especially when they are exploring field-deployable technology for mission-critical use. The Royal Dutch Navy asked it too. After all, knowing the limits of your tools can be the difference between success and failure in the field.
It was this very question that brought together engineers from UltiMaker, a global leader in 3D printing solutions, Covestro, a world-leading manufacturer of high-quality polymer materials, and the Royal Dutch Navy. Their mission: to put 3D-printed parts to the test. But they weren’t going to do it the conventional way…
The conventional way to measure a material’s strength is by using a tensile testing machine. A small sample is printed and put under a large force until it snaps. The force projected on the part divided by the surface of the center intersection at the time of breaking will express its strength.
While these numbers mean a lot to engineers, sometimes “seeing is believing”. To really render an image in the minds of people on how strong 3D printed parts can be, Covestro, the Dutch Royal Navy, and UltiMaker started a unique collaboration to lift something seriously heavy.
But what would work? Gym weights? A motorbike? A car? Perhaps a large jeep? And then the Dutch Royal Navy asked: “Why not an armored vehicle?”
Creating the initial design
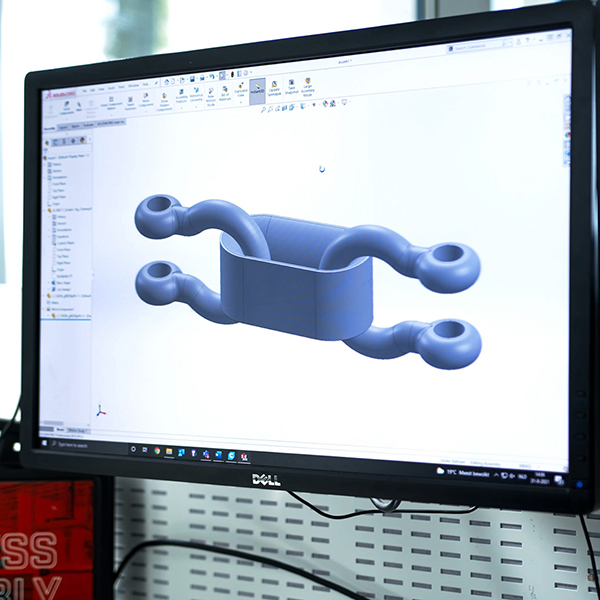
To lift a heavy vehicle using a 3D printed part, first an analysis of the hardware was necessary. The Royal Dutch Navy had a special lifting tank at its disposal which used two openable steel rings to connect to a crane and to cables which would attach to the lifted vehicle. A 3D printed elongated O-shaped link would connect these two metal rings and lift the heavy vehicle.
After importing the geometry of the steel rings into CAD software, UltiMaker Application Engineer, Lars de Jongh was able to create the initial design for the link. De Jongh first defined the design requirements:
- The link needed to have a flat side for a stable 3D print
- The link needed to be printed with the layer lines in the same direction as the forces projected on the part
- The printed part and metal rings’ interacting surface should be as large as possible to spread forces evenly
Finding the right material
The material needed for this test needed to be extremely strong but also needed to be able to absorb short peak forces. The UltiMaker Marketplace is filled with hundreds of materials, each of them has a unique combination of properties. In this case Addigy F1030 CF10 from Covestro matched the set requirements. This nylon-based polymer is loaded with carbon fiber and can be printed using the UltiMaker Factor 4 or the S Series, from the S5 onward, using a CC print core.
Optimizing the design using simulations
It takes less time to 3D print a solid, 2kg link than producing it with traditional methods. However, the number of iterations necessary to validate the right geometry meant that time was still a factor. Consequently, the design was optimized before printing using computer simulations.
Covestro digitally applied the forces on the design using software that knows the exact physical properties of the carbon fiber nylon material. By running simulations, it was identified where the design needed to be adjusted and where material could be removed. This created an optimized design which could lift more weight, while using less material, resulting in a faster production time with less cost.
Verifying the simulation
Before lifting the heavy vehicle, verification of the printed part’s calculated physical strength was required. Two designs were generated for two sizes. The first was a 1kg link which was estimated could withstand 12 tons. The second weighing roughly 2 kg was estimated to be able to withstand 38 tons. The Royal Dutch Navy has an on-site industrial tensile tester which can project up to 343 kilonewtons of force on an object. Both the initial and optimized versions were tested for the large and small version.
The optimized design was able to withstand a higher force, while weighing a third less. The difference between the tested results and the simulated numbers were also extremely close, being only 1% off on average. This verified the workflow was accurate and profitable in terms of time-to-market and increased performance.
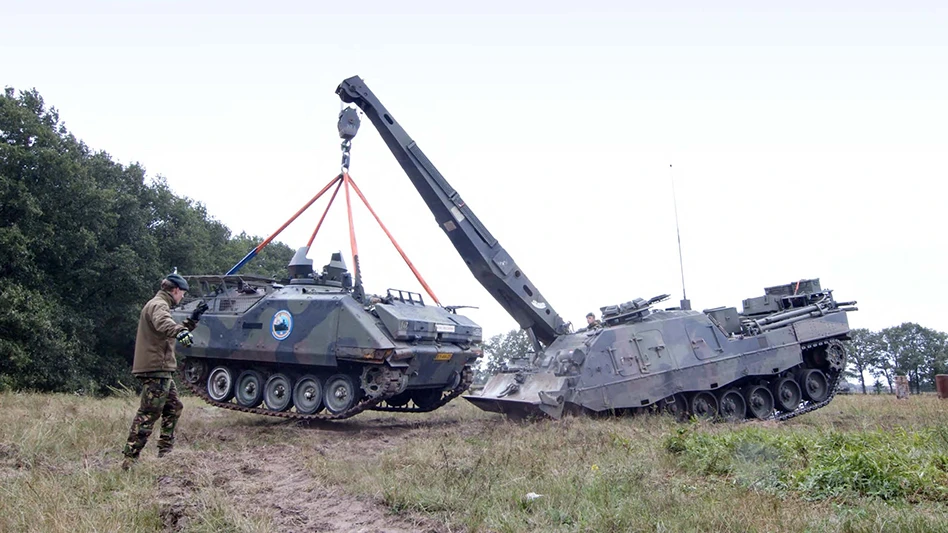
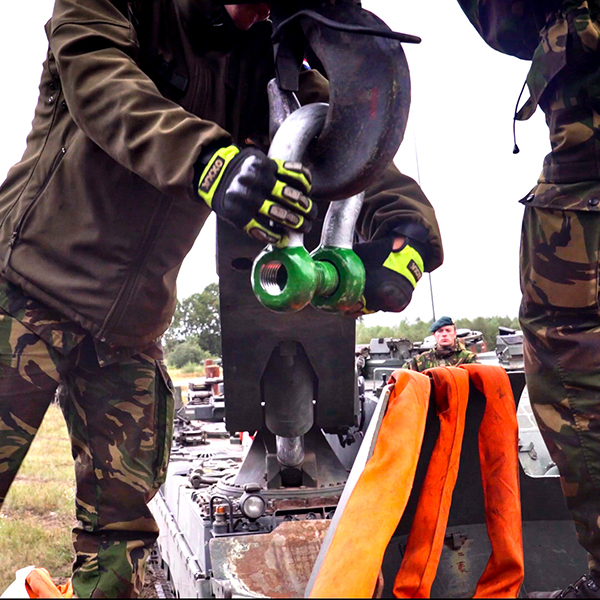
Lifting two vehicles
After several months of designing, printing, testing, and planning, it was time for action. Two links were about to lift a heavy military vehicle. On a Dutch Army base in the southern Netherlands, the 13th Light Rhino Brigade assisted with an armored recovery vehicle. The Leopard 2 “Buffalo” has a crane mounted on the front and is designed to recover heavy vehicles such as trucks and battle tanks.
As a warm-up, the 1kg link was used to lift a military version of a Mercedes jeep weighing over 2 tons. This was not a problem at all: the vehicle was easily lifted. Then, it was time for something bigger.
The 2kg solid carbon fiber reinforced nylon link was placed between the M113 armored vehicle and the Buffalo crane. The metal rings were tightened in place, and four cables were attached from the lower hook to the vehicle. The crane slowly started to move up, putting the cables and 3D printed part under tension. Then, the 12-ton vehicle slowly rose up, hovering above the ground, hanging from a 3D printed link. The Buffalo drove around – backwards, forwards, and turning – but the link held up perfectly. The collaboration produced a very successful result.
Learnings and key takeaways
The project wasn’t just a success because of the working link. The CAD simulations, not only simulated shapes, but gave accurate predictions taking the specific material – and even fiber direction – into account. The accuracy of such tools is a major benefit for engineers.
While all parts were printed in properly maintained rooms and the materials were not exposed to moisture, there was still a noticeable difference between versions printed in a dry warehouse, and parts printed with deliberately dried spools of filament in a heated, dry print room. Nylon absorbs moisture and this can result in weaker prints. Consequently, it’s very important to know materials’ properties and handle them accordingly.
Latest from Defense and Munitions
- Allient Inc. releases new whitepaper on motor selection for drone systems
- Fairbanks Morse Defense expands robotic welding capabilities to strengthen fleet readiness and reduce maintenance downtime
- Mastercam 2026.R2 delivers GPU-accelerated simulation and AI-powered assistance
- Michigan warfighting center chosen to lead training in groundbreaking drone technology
- Lyndex-Nikken new website helps manufacturers quickly search, evaluate, and specify machine tool accessories
- AeroVironment expands AV_Halo unified software platform with CORTEX and MENTOR
- Stratasys begins qualification of SAF PA12 production-ready nylon for key industrial use cases
- Magnet Defense acquiring ATG